Setting up a Guest Sign-In Please follow the steps below for setting up a basic In/Out Kiosk. |
 |
Configuring Your General Options |

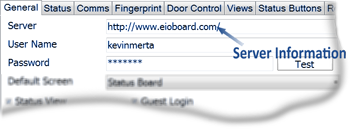
Put in your Server Information
EIOBoard-Hosted use http://www.eioboard.com and the username a password supplied to you by EIOBoard.
Customer-Hosted use http://YourServer and Username and Password you set up during installation
|
| |
|
| |
 |
|
| |
| |
| |
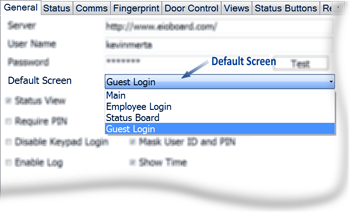 |
Choose the Guest Login option for your Default Screen. This is the first main screen of the Kiosk. |
|
| |
| |
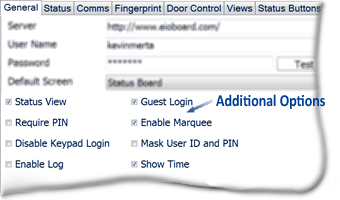 |
Add Additional Options: |
| |
 |
Status View - selected by default when choosing Status Board as the Default Screen. |
| |
|
Require Pin - requires a pin for each of your guest to login. |
| |
|
Disable Keypad Login - if your hardware has a keypad this option will disable it. |
| |
|
Enable Log - a log will be created for every entry into the Kiosk.
|
| |
|
Guest Login - Not used for Large Screen Display option. This option will display the Guest Login button on the sign in page. |
| |
|
Enable Marquee - Displays the Marquee on the Status Board View. |
| |
|
Mask User ID and Pin - the user id and pin will not be hidden during login. |
| |
|
Show Time - Displays the time in HH:MM:SS on the main sign in page. |
|
| |
| |
 |
Choosing Your Status Options |
| |
|
| |
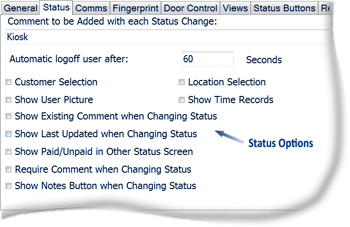 |
Setting Up the Status Options |
| |
|
Automatic Logoff User - choose a length of time you want a user to be logged in. |
| |
|
Customer Selection - allows user to select a customer when changing status
|
| |
|
Show User Picture - a picture will be displayed for each user. Pictures can be uploaded using the Application, Browser or Outlook Add-in Interfaces. Go to Administrator > Click on User > Click the picture button. |
| |
|
Show Existing Comment when Changing Status - allows user to select a customer when changing status |
| |
|
Show Last Updated when Changing Status - shows the last update time stamp with the date and time |
| |
|
Show Paid/Unpaid in other Status Screen - this option is for the Timesheets feature |
| |
|
Require comment when Changing Status - requires the user to add a comment when changing their status. |
| |
|
Show Notes Button when Changing Status - displays the note button on the login screen |
|
| |
| |
 |
Configuring the View |
| |
| |
|
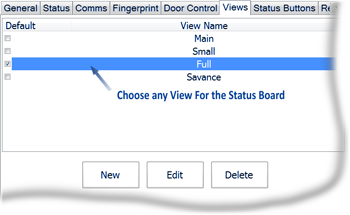 |
Choose a view to be displayed on the Status Board Screen. For the Guest Login choose a view for the Status Board. You can customize a display by choosing New. |
| |
|
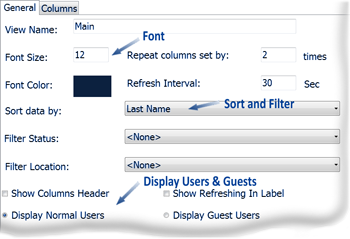 |
You can change the Font Size and Color and Sort and Filter the display to show only certain information. You can choose to display both the Normal and Guest Users on the Status Board |
|
| |
|
| |
 |
Here is where you Adjust the columns to fit the Resolution of your display. You can also Add Columns to you display such as Name, Status, Time, Notes, etc. |
|
| |
| |
 |
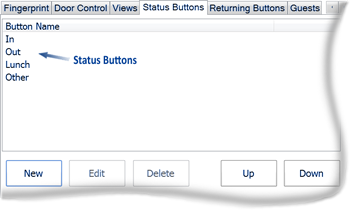
Add or Edit a Status Button |
| |
| You can Add, Edit, or Create buttons to mask a Status. These buttons are displayed when a user logs in and out to show their current or future status. |
| Change Status Buttons |
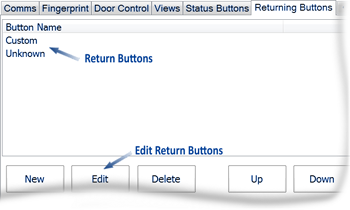
Return Buttons |
 |
 |
|
| |
| |
 |
Setting Up Guest Options |
|
| |
| You can Add, Edit or Create buttons to mask a Status. |
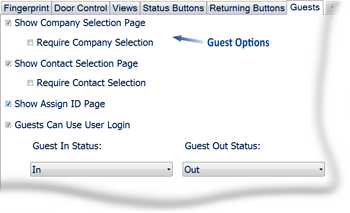 |
Company Selection - selected by default when choosing Status Board as the Default Screen. |
| Contact Selection - Not used for Large Screen Display option. This option will display the Guest Login button on the sign in page. |
| Assign ID - Guest will be supplied an Id when signing in. The Id can be used every time the Guest logs in |
| Use User Login - Guests can use the Main Login screen to sign in and out |
| Guest Status - Choose Status option for Guest logging in and out |
| |
| |
|
| |
| |
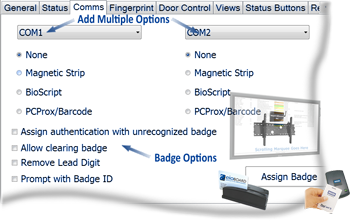
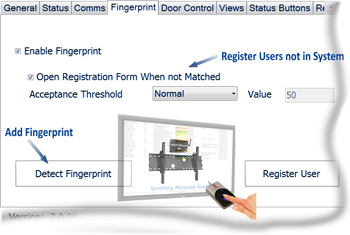
| Optional: Setting up a Badge or Fingerprint |
| |
| You can setup a badge or fingerprint to work with the Kiosk. Users can swipe a badge or use their fingerprint to check in and out. |
| Badge |
Fingerprint |
 |
 |
|
| |
| |
| Optional: Door Control |
| |
| You can setup a door control using several of our devices or existing hardware. It can both control door lock and change the status of users at the same time. |
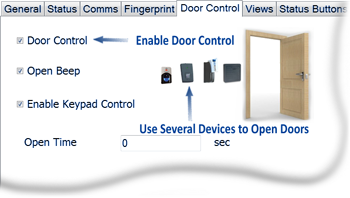 |
Door Control - Enables the Door control Option Open Beep - a beep sound occurs to confirm door is open Enable Keypad Control - enable the use of a keypad. |
|